Sugar is annoying to get. If you've ever spent three hours punching green stalks by a river just so you can trade with a Librarian or craft a stack of rockets, you know exactly what I mean. It’s tedious. It’s manual. It’s honestly the kind of busywork that Minecraft players should outgrow by their second day in a new world.
Building an automatic sugarcane farm isn't just about being "technical." It’s about freedom. Once you have a steady stream of cane flowing into a chest, the entire economy of your game changes. You stop worrying about paper for enchantments. You stop rationing your firework rockets when flying with Elytra. You basically become a tycoon of the plains.
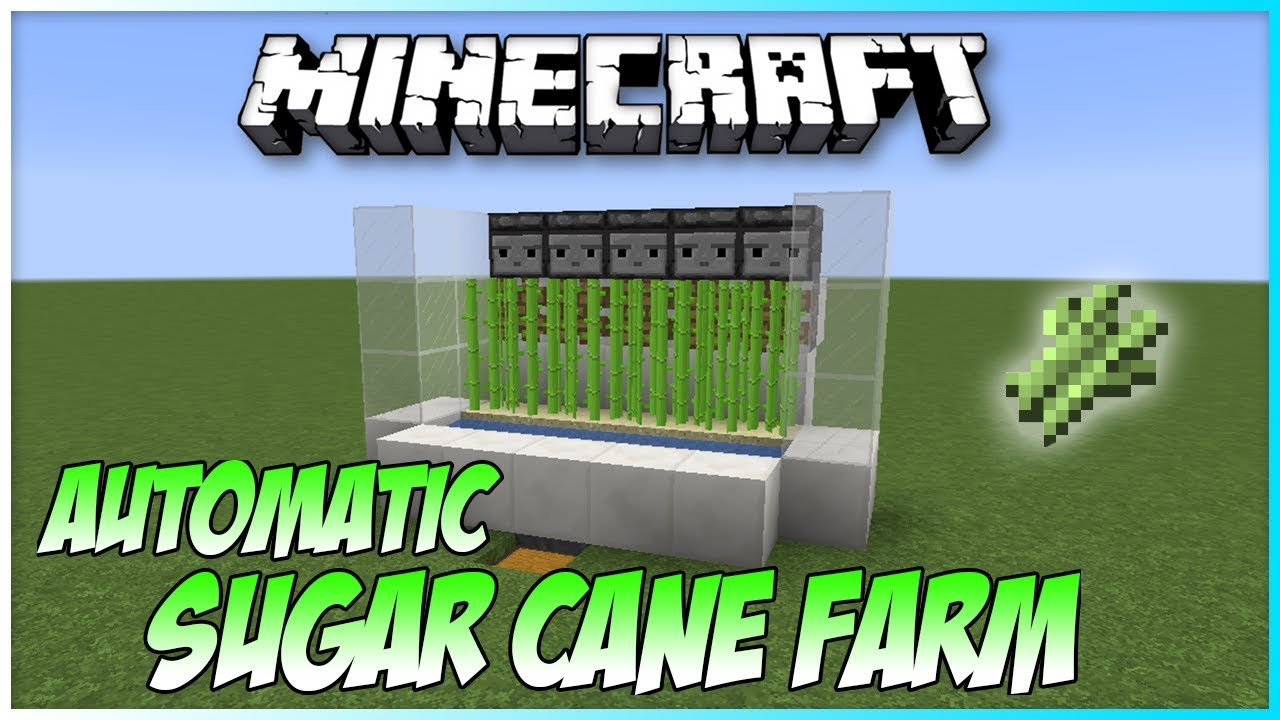
The beauty of the most common design is its simplicity. You don't need a degree in Redstone engineering or a massive pile of Quartz from the Nether to make it work. Just a few observers, some pistons, and the patience to place a few blocks.
The Logistics of Growing Cane
Sugarcane is picky, but predictable. In Minecraft, it only grows on sand, dirt, coarse dirt, podzol, or red sand if that block is directly adjacent to a water source. It doesn't matter if it's a flowing stream or a source block. It just needs that moisture.
Most people make the mistake of thinking they need some massive, sprawling field. You don't. Because sugarcane grows up to three blocks tall, we can exploit that growth cycle. When the plant reaches that third block, a sensor (the Observer) detects it, sends a signal, and a piston smashes the middle block. This breaks both the top and middle sections, leaving the base to grow all over again.
It’s an infinite loop.
Gathering Your Materials
Before you start digging holes, you need the right kit. Don't overcomplicate this. You’ll need some solid building blocks—Cobblestone is fine, but Smooth Stone or Glass looks way better if you want to actually see the farm working.
You’re going to need:
- Observers (One for every plant you want to automate)
- Pistons (Standard ones, not sticky)
- Redstone Dust
- Hopper and a Chest for the collection system
- Water Buckets
- Sugarcane (Obviously)
- Glass Panes (To keep the items from flying everywhere)
A lot of players ask if they should use Sniffer plants or some other weird mechanic. Honestly? No. Stick to the classic Observer-Piston combo. It’s the gold standard for a reason: it almost never breaks. Redstone updates in version 1.21 and the 1.22 snapshots haven't changed the fundamental way these blocks interact, so this design is as future-proof as it gets.
Building the Foundation
Start by digging a trench. Let's say eight blocks long, because that’s how far water flows. Place your water at one end so it flows toward a hole at the other. This is your transport line.
In that hole at the end, place a hopper pointing into a double chest.
Now, place your dirt or sand along the edge of that water. Plant your sugarcane. This is the "living" part of the automatic sugarcane farm.
The Redstone Layer
Behind your sugarcane, place a row of solid blocks. On top of those blocks, place your pistons facing the cane. These should be at the second-block height. Why? Because if you break the bottom block, the whole plant disappears and you have to replant it manually. We want the piston to hit the middle.
On top of the pistons, place your Observers. Make sure the "face" is looking at the space where the third-high sugarcane will grow. The little red dot on the back of the Observer should be facing away from the water.
Wiring it Up
This is the part where people usually get nervous, but it’s literally one step. Place a row of solid blocks directly behind the pistons. Then, run a line of Redstone Dust across those blocks.
When the sugarcane grows to height three, the Observer "sees" it. It sends a pulse to the Redstone Dust. That dust powers the blocks behind the pistons, which triggers the pistons to fire.
Clack. The cane is harvested. It falls into the water, floats down to the hopper, and sits in your chest waiting for you.
Why Your Farm Might Be Failing
If you’ve built this and you’re seeing sugarcane sitting on the dirt instead of in your chest, you have a collection problem. Sugarcane has a weird "hitbox" when it breaks. It likes to fly off in random directions.
This is where the glass comes in. You need to encase the front of the farm. Build a wall of glass two or three blocks high right in front of the cane. This forces the harvested items to fall straight down into the water.
Another common issue is light levels. While sugarcane doesn't technically need a high light level to grow (unlike wheat), you should still light up the area to prevent mobs from spawning inside your machinery. A stray Creeper in your Redstone wiring is a quick way to have a very bad afternoon.
Scaling for Massive Output
If one row of eight isn't enough, don't just make it longer. Make it taller. You can stack these modules on top of each other. Just mirror the design and use a central water drop or a series of hoppers to funnel everything into one main storage room.
On many survival servers, players build "towers" of these farms that reach from bedrock to the sky limit. Is it overkill? Maybe. But if you’re trying to supply an entire server with paper for maps or rockets, it’s the only way to fly.
Also, consider the "Zero-Tick" controversy. A few years ago, you could use a glitch to make sugarcane grow instantly. Mojang patched most of those out in the 1.16 update. Don't waste your time looking for "fast" designs that rely on bugs; they usually get patched out and leave you with a broken pile of stone. The "Observer-Piston" method is the intended way to play.
Practical Steps to Optimize Your Production
To get the most out of your setup, keep these nuances in mind:
- Use Mud Blocks: In recent versions, you can place mud over a hopper. Because mud isn't a full block height, the hopper underneath can actually "suck" items through the mud. This allows you to grow cane on the mud and collect it without needing water streams at all. It’s a cleaner, more compact look.
- Chunk Loading: Remember that crops only grow when a player is nearby (within random tick range). If you build your farm 2,000 blocks away from your main base, it will never produce anything while you're at home. Build it near your storage or your AFK spot.
- The Villager Connection: Your end goal should be a row of Librarian villagers. Trade that "free" paper for Emeralds. Use those Emeralds to buy Mending books and Diamond gear. This is how you "win" Minecraft survival.
The next time you're staring at a riverbank waiting for plants to grow, stop. Go grab some iron for pistons and some quartz for observers. You'll spend twenty minutes building the farm and never have to manually harvest a single stalk of cane again.
Start by clearing a 10x10 area near your primary base. Lay down your first water line today. Once the first chest fills up, you'll realize why this is the first "industrial" project every veteran player completes.