You've finally got the iPhone 16 in your hands. It feels great, the camera is incredible, and the new Action Button is actually useful. But then you want to show a friend how to navigate a specific app or maybe capture a wild glitch in a game. You swipe down, look for that little record circle, and... nothing. It isn't there.
It's kind of annoying that Apple doesn't just have it enabled by default, but honestly, it takes about thirty seconds to fix. Most people think it’s tucked away in some deep privacy menu. It's not. It’s a Control Center thing.
Getting the Record Button Into Your Control Center
To actually turn on screen recording on iPhone 16, you first have to tell the phone you want that shortcut available.
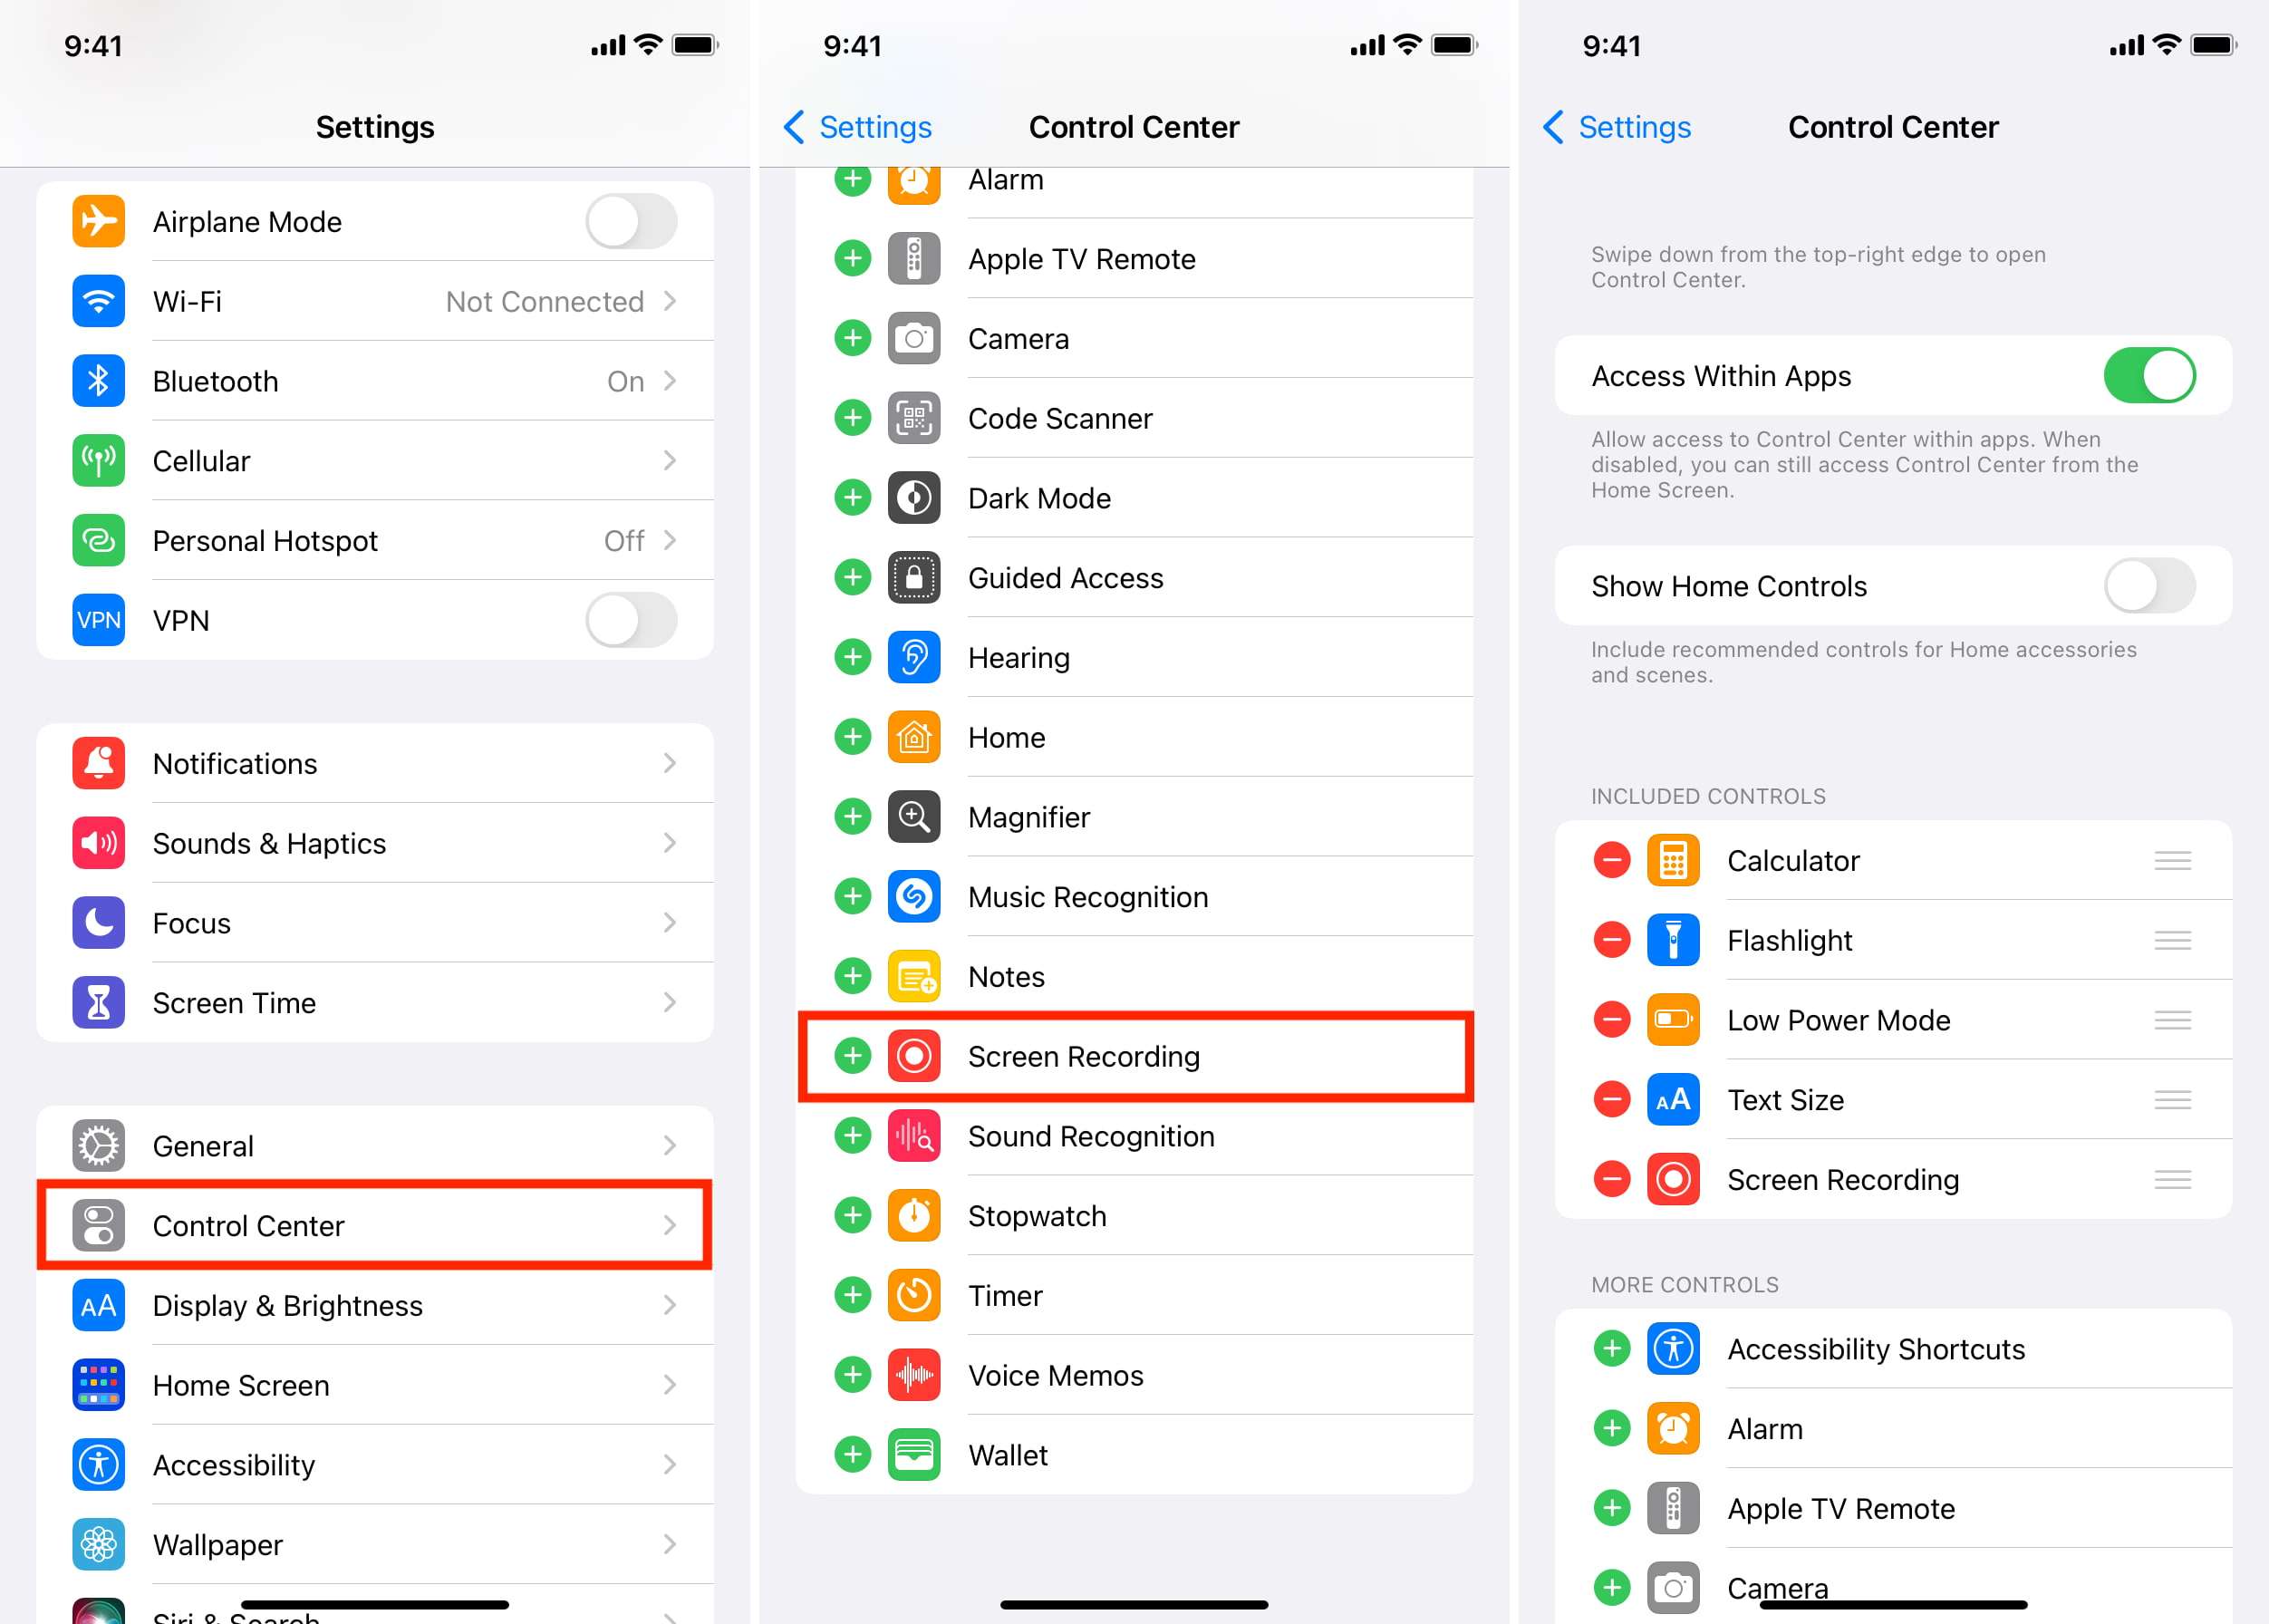
- Pop open your Settings app.
- Scroll down a bit until you see Control Center.
- This is where it gets a little different if you're on the latest iOS 26 or even the launch software. You’ll see a list of "Included Controls." If Screen Recording isn't in that top list, keep scrolling.
- Find Screen Recording under the "More Controls" section and hit that green plus (+) icon.
Boom. Now it's in your tray. You can actually drag those three little lines next to the controls to move it higher up. I usually keep mine right near the flashlight because those are the two things I use the most when I'm in a hurry.
The "New" Way to Add Controls
If you are running the newest software (like iOS 18 or 26), there is a shortcut. Swipe down to open your Control Center from the top right. Long-press on any empty black space. You'll see an Add a Control button pop up at the bottom. You can search "Screen Recording" right there and add it without ever opening the Settings app. It’s way faster.
How to Actually Start Recording (And Not Mess Up)
Now that the button is there, using it is straightforward, but there is a 3-second delay you need to account for.
Swipe down from the top-right corner of your screen—right where the battery icon lives. Tap the Screen Recording icon (the circle with the dot inside). You’ll see a countdown: 3, 2, 1.
Pro Tip: Use those three seconds to swipe the Control Center back up. If you don't, your video will start with a giant view of your brightness sliders and Wi-Fi toggles, which looks kinda messy if you're sending this to a client or posting it on social media.
When you're recording, you’ll see a red status bar or a red glow around the Dynamic Island at the top. To stop, just tap that red area. A little pop-up will ask if you want to stop. Tap "Stop," and the video saves instantly.
The Secret to Recording With Audio
This is what most people get wrong. They record a whole tutorial, watch it back, and realize there’s no sound. By default, your iPhone records "system audio" (the sounds the apps make) but it does not record your voice.
If you want to narrate what you're doing:
- Open the Control Center.
- Long-press (don't just tap) the Screen Recording icon.
- A hidden menu pops up.
- Tap the Microphone icon at the bottom so it turns red and says "Microphone On."
- Tap "Start Recording" from that same menu.
Now, it’ll pick up your voice through the phone's bottom mic while also capturing the screen. Just remember that if you have your ringer on "Silent," it might still suppress some in-app sounds depending on the app's privacy settings.
Where Does the File Go?
Every single recording ends up in your Photos app.
If you've been recording for a long time, the file might take a second to "process" before it shows up in your library. Don't panic if it isn't there the exact millisecond you hit stop.
With the iPhone 16 and iOS 26, Apple actually lifted some of the old resolution caps. Screen recordings used to be compressed to 1080p regardless of your screen size. Now, if you're on an iPhone 16 Pro or Pro Max, you’re getting much higher fidelity captures that actually match the native resolution of your display. This makes a massive difference if you're recording text-heavy documents or high-end mobile games like Genshin Impact or Resident Evil.
Limitations You Should Know About
You can't record everything. Apple is pretty strict about Digital Rights Management (DRM).
- Streaming Apps: If you try to screen record a movie on Netflix, Disney+, or Max, the video will just be a black screen. The audio might play, but the visuals are blocked.
- Privacy Screens: Some banking apps or "Secret" chats in Telegram might trigger a block or notify the other person if you try to capture the screen.
- Phone Calls: You generally cannot record a standard cellular phone call's audio using the built-in screen recorder for legal/privacy reasons.
Customizing with the Action Button
Since you're on an iPhone 16, you have the Action Button on the side. While there isn't a "native" screen record toggle in the default Action Button settings, you can set it up using the Shortcuts app.
Create a shortcut that "Starts Screen Recording" and assign that shortcut to the Action Button. It’s a bit of a power-user move, but it’s great if you find yourself recording your screen multiple times a day.
Handling Large Files
High-res recordings on the iPhone 16 can eat up storage fast. A ten-minute recording in full resolution can easily top 1GB.
If you're running low on space, go to Settings > Photos and make sure "Optimize iPhone Storage" is on. Or, better yet, once you’ve sent the clip to whoever needs it, move it to a folder in the Files app or upload it to iCloud and delete the local copy.
Next Steps for Your iPhone 16:
- Check your Control Center: Swipe down now to see if the record icon is already there.
- Do a test run: Record a 5-second clip of your home screen with the microphone on to make sure your audio levels are clear.
- Trim the ends: Open the video in the Photos app, hit "Edit," and slide the yellow bars at the start and end to remove the footage of you opening and closing the Control Center.