You’ve been there. You open a photo, grab the tool, and drag the corners until it looks "okay." But then you realize you cut off someone's elbow or the horizon looks like a sinking ship. Honestly, learning how to crop image in photoshop isn't just about making a picture smaller. It’s about composition, resolution, and not destroying your original pixels in a fit of creative rage. Most people just hack away at the canvas. Stop doing that.
Photoshop is a beast. It’s powerful, but it’s also remarkably good at letting you make mistakes that are hard to fix later. If you’re just hitting the 'C' key and dragging wildly, you’re missing out on features like Content-Aware Fill and non-destructive workflows that make professional editors look like wizards. Let's break down the actual way to handle your frames without losing your mind.
The Basic Crop: More Than Just a Box
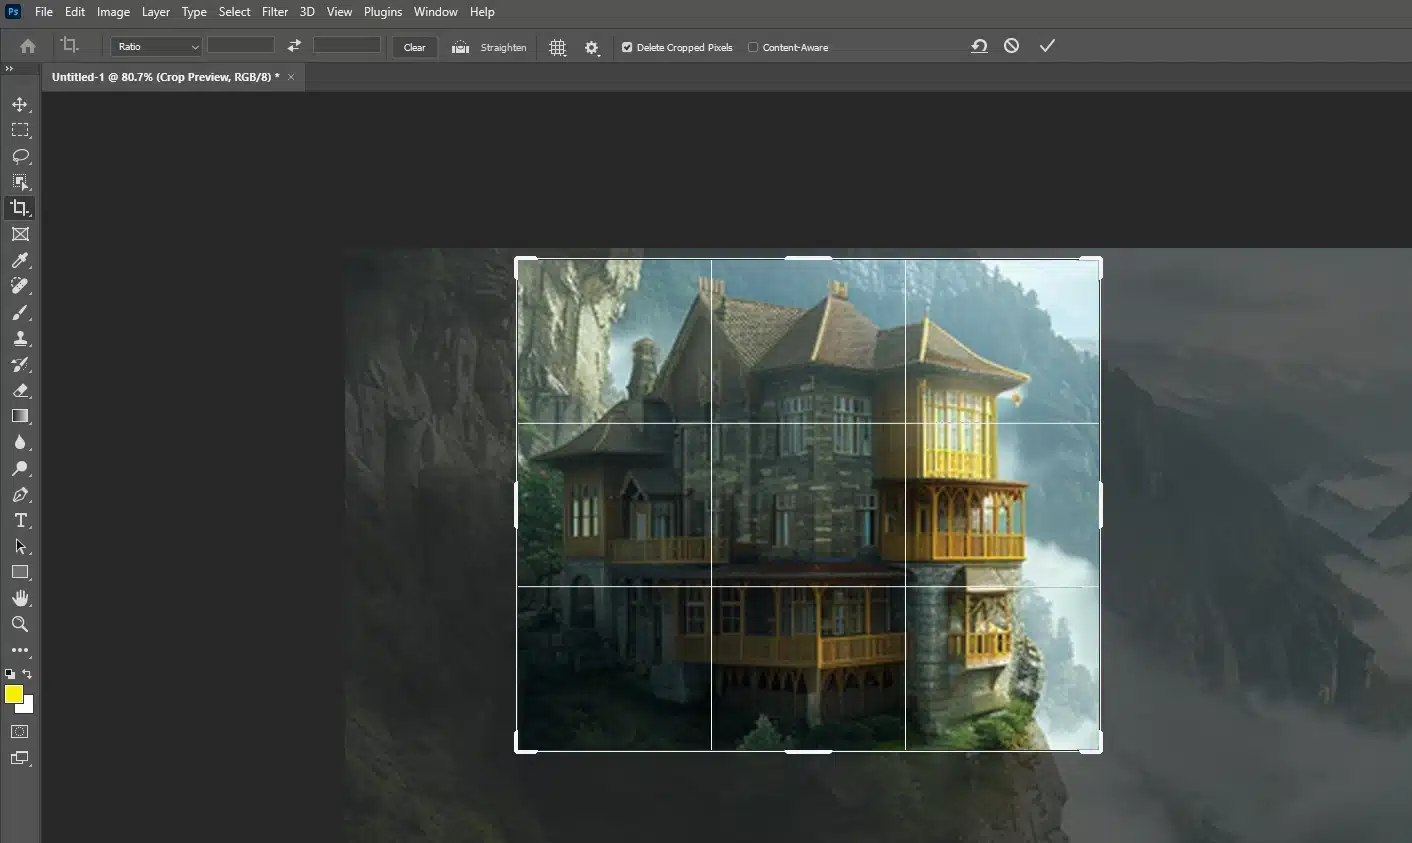
The Crop Tool is located in the toolbar, usually the fourth or fifth icon down. Or just hit C. That's the shortcut. When you activate it, Photoshop puts a border around your whole image. You’ll see handles on the corners and the sides.
Now, here is where people mess up immediately. Look at the top options bar. See that checkbox that says Delete Cropped Pixels? Turn it off. Seriously. Uncheck it right now. If you leave that checked, once you hit Enter, every pixel outside your crop area is gone forever. If you decide ten minutes later that the crop was too tight, you’re out of luck. By unchecking it, Photoshop hides those pixels instead of deleting them. It's a lifesaver.
Ratios and Why They Matter
Up in that same top bar, you’ll see a dropdown menu. It might say "Ratio" or "Original Ratio." If you’re prepping a photo for Instagram, you probably want 4:5. For a standard print, maybe 8:10 or 5:7. You can type these numbers directly into the boxes next to the dropdown.
Sometimes you just want a freeform shape. Clear those boxes. Just hit the "Clear" button. Now you can drag the handles wherever you want without the software forcing you into a specific rectangle shape. It feels more natural, right? Just remember that if you're printing, those weird custom shapes might lead to some awkward white borders at the local pharmacy print shop.
The Secret Magic of Content-Aware Crop
This is where things get spooky. Sometimes you want to rotate a crooked photo, but when you straighten it, the corners of your frame end up empty. Normally, you’d have to crop in even tighter to hide those white triangles. That sucks.
Instead, check the box labeled Content-Aware in the top menu bar before you commit to your crop. When you rotate the image or expand the crop box beyond the original edges of the photo, Photoshop looks at the surrounding pixels and literally invents new ones to fill the gaps. It’s not perfect—if you try to invent a whole new mountain range, it’ll look like a blurry mess—but for filling in a bit of blue sky or some grass at the edge of a frame? It’s basically black magic.
Adobe’s Sensei AI engine handles this. It’s been getting better every year, and by 2026, the blending is almost indistinguishable from reality in most outdoor shots.
Straightening the Horizon (The "Spirit Level" Trick)
Nothing screams "amateur" like a tilted ocean. If your photo looks like the water is about to slide out of the left side of the screen, use the Straighten tool. It’s located in the options bar when the Crop Tool is active. It looks like a tiny spirit level.
Click it. Then, find the horizon line in your photo. Click and drag a line across that horizon. When you let go, Photoshop automatically rotates the image so that line is perfectly horizontal. It’s much faster than trying to eyeball the rotation handles and squinting at your monitor.
Why You Should Use Grids
Inside the Crop Tool, there's a little icon that looks like a tic-tac-toe board. These are your Overlay Options. Most people stick with the "Rule of Thirds," which is great for general balance. But try the Golden Spiral. If you’re doing high-end portraiture or architectural photography, aligning your subject with the Fibonacci sequence (the spiral) creates a much more "pro" feel. It guides the eye. It feels intentional. It’s the difference between a snapshot and a composition.
Perspective Cropping: Fixing the "Leaning Building" Effect
Have you ever taken a photo of a tall building from the ground, and it looks like the top of the building is shrinking away from you? That’s perspective distortion. The standard Crop Tool won't fix that.
You need the Perspective Crop Tool. Long-press the Crop Tool icon in the sidebar to find it. Instead of a simple rectangle, you click four points—usually the four corners of the object you want to "flatten." Once you hit Enter, Photoshop stretches and pulls the image so that the object appears flat and square to the camera. It’s vital for scanning documents with your phone or shooting real estate.
Non-Destructive Habits for Professionals
If you’re working on a complex project, don't just crop the base layer. Convert your image to a Smart Object first. Right-click the layer, hit "Convert to Smart Object." Now, when you crop, you aren't actually touching the raw data of the image.
Professional retouchers at agencies like Sartorial or Vogue rarely use the "Delete Cropped Pixels" method. They prefer to use Layer Masks. If you want a specific shape, sometimes it's better to use the Marquee tool (M), select your area, and hit the Mask icon at the bottom of the layers panel. This gives you total control. You can "uncrop" by just painting on the mask with a white brush.
The Resolution Trap
Watch out for the W x H x Resolution option in the crop dropdown. If you type "300 px" into the resolution box, but your image was originally 72 dpi, Photoshop is going to "resample" the image. It basically makes up pixels to hit that number. This often makes the image look soft or "mushy."
Only use this if you specifically know the output requirements of your printer. Otherwise, stick to "Ratio" and let the pixels stay at their native density.
Common Mistakes to Avoid
- Over-cropping: Don't zoom in so far that you see the "pixels." If you're losing more than 50% of the image, you probably should have stood closer with the camera.
- Centering everything: Placing your subject right in the middle is often boring. Use the Rule of Thirds to give the subject some "room to breathe" in the direction they are looking.
- Forgetting the edges: Look at the very perimeter of your crop. Is there a stray finger? A trash can? A half of a person? Crop those distractions out to keep the focus where it belongs.
Actionable Next Steps
To truly master this, don't just read about it. Open Photoshop and grab a photo that feels a bit "messy."
- Select the Crop Tool (C) and immediately uncheck Delete Cropped Pixels.
- Experiment with the Straighten tool on any diagonal line in the background.
- Try the Content-Aware checkbox while rotating the frame to see how well it fills in the corners.
- Toggle through the Overlay Options (O) to see how the Golden Spiral changes your perspective on the composition.
- If the image looks grainy after a heavy crop, use Filter > Noise > Garbage Reduction (or the newer AI Denoise features) to clean up the resulting artifacts.
Getting the frame right is the simplest way to upgrade your photography without buying a new lens. It’s the final stage of "taking" the picture. Treat it with the same respect you give your lighting and your focus.